
At a Glance
Safely transporting livestock requires truck, hitch, and trailer be correctly matched so that drivers can safely control the load and stop. Overloading, shifting of the animals, and neglected mechanical components dramatically increase the risk of accidents. Proactive routine maintenance and safety checks—directly prevent catastrophic vehicle failures.
What is the Primary Risk of Overestimating Weight Capacities and Neglecting Trailer Maintenance?
Mismatched equipment or unmaintained structural elements can lead directly to severe control loss, extended stopping distances, and catastrophic equipment failures. In a trailer, accumulated manure alone adds deadweight, accelerates structural rot and corrosion and increasing risk of animal breakthroughs. Worn and weathered tires, failed emergency breakaway systems, or mismatched hitch components can result in high-speed blowouts, trailer disconnects, and rollover accidents.
How Can Haulers Ensure Vehicle Preparedness and Prevent Roadside Accidents?
Safeguarding transport operations relies on three essential technical pillars:
- Capacity Matching: Verify that truck, hitch ball, receiver, and trailer Gross Vehicle Weight Ratings (GVWR) exceed total loaded weight.
- Maintenance and Inspections: Keep up with routine maintenance and conduct regular inspections of the truck and trailer for roadworthiness prior to hauling.
- Emergency Readiness: Pack dedicated trailer jacks and/or ramps, safety triangles, spare tires, wheel chocks, and tools for changing tires and small repairs.
Introduction
Hauling is stressful for livestock and can be for people, too. It becomes more stressful and even dangerous when breakdowns or other problems occur. Livestock haulers face added risk when other drivers fail to recognize the longer stopping distances required by large trucks, especially in heavy traffic. An additional risk is load shifting due to the cargo being live animals. Rapid changes in speed or quick maneuvering (abrupt lane changes or turning too fast) can cause rapid cargo shifts. Animals shift their weight to avoid falling down in response to the changes in speed or direction, making stopping even more difficult or causing tip overs. Regular truck and trailer maintenance is paramount for safe and efficient livestock transportation. It reduces the risk of costly breakdowns, ensures animal welfare, and improves safety for haulers, animals, and other motorists. Trucks and trailers hauling livestock endure tough operating conditions, requiring regular attention and maintenance to prevent damage and delays. By following best practices, producers can enhance safety and reliability, ensuring a smoother journey for both livestock and drivers.
Truck, Trailer, and Hitch Capabilities
Truck
Can the truck handle the load you plan to transport? Getting the load moving is not where problems usually occur; more importantly, can the truck control and stop the load? Is your current truck correctly matched to your trailer for maximum load and licensed capacity? When buying a truck or trailer, it is important to make sure the tow vehicle is rated to safely pull the amount of weight you intend to use it for. Truck model numbers usually provide a general idea of load capacity. For example, 150/250/350 or 1500/2500/3500 correspond to different duty ratings. Towing and load capacity can differ within model numbers. Components and subassemblies that determine load and towing capacity are:
- Frame, suspension, axles, brakes
- Engine, transmission, axle/differential gear ratio
- Dual or single rear wheels, wheel size
Cab configuration, 4-wheel vs 2-wheel drive, and other body style differences can also impact towing capacity, usually to a lesser extent than the major components listed above. Auto and trailer dealers should be able to provide information on the specific truck or trailer you are considering.
A specific truck’s weight, load and towing capacity are defined by several different terms:
Curb Weight – weight of truck with all fluids filled and no additional payload
Gross Vehicle Weight Rating (GVWR) – weight of vehicle plus payload, includes tongue or gooseneck trailer weight applied to the truck
Gross Combined Weight Rating (GCWR) – maximum weight of loaded vehicle and loaded trailer
Maximum Trailer Weight Rating – maximum weight of a loaded trailer the truck is safely rated to pull
These weights and capacities may be found on a tag in the driver’s door frame of the truck or ask your dealer (Figure 1).
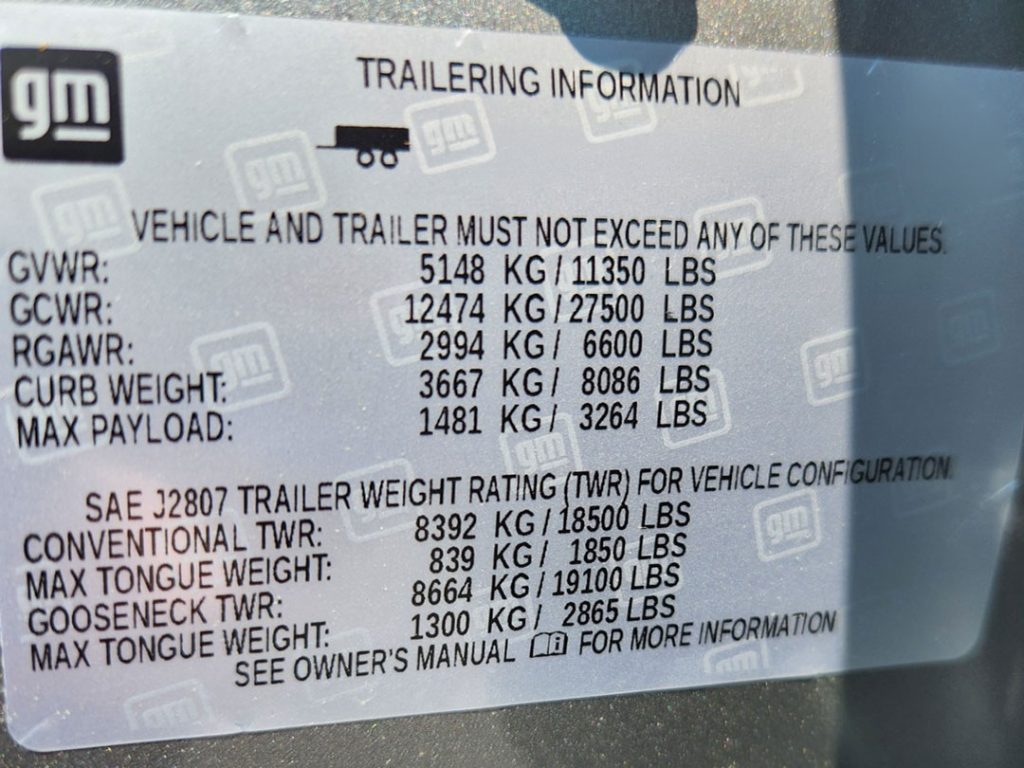
Figure 1. An example of a load and towing capacity tag from a pick-up truck.
Trailers
Trailers also vary in their load capacity. Trailers of the same make, model, and size may have different capacities depending on axles and configuration. Trailers should have a tag (Figure 2) on them showing the Gross Vehicle Weight Rating (GVWR) which is the maximum weight the trailer is rated for and includes the weight of the trailer along with everything included in the load. Knowing the Curb Weight (empty weight of the trailer) is necessary to determine what the maximum weight of the actual load can be. The tag also contains Gross Axle Weight Rating (GAWR) for each axle along with tire, rim and tire inflation necessary to meet the GVWR.
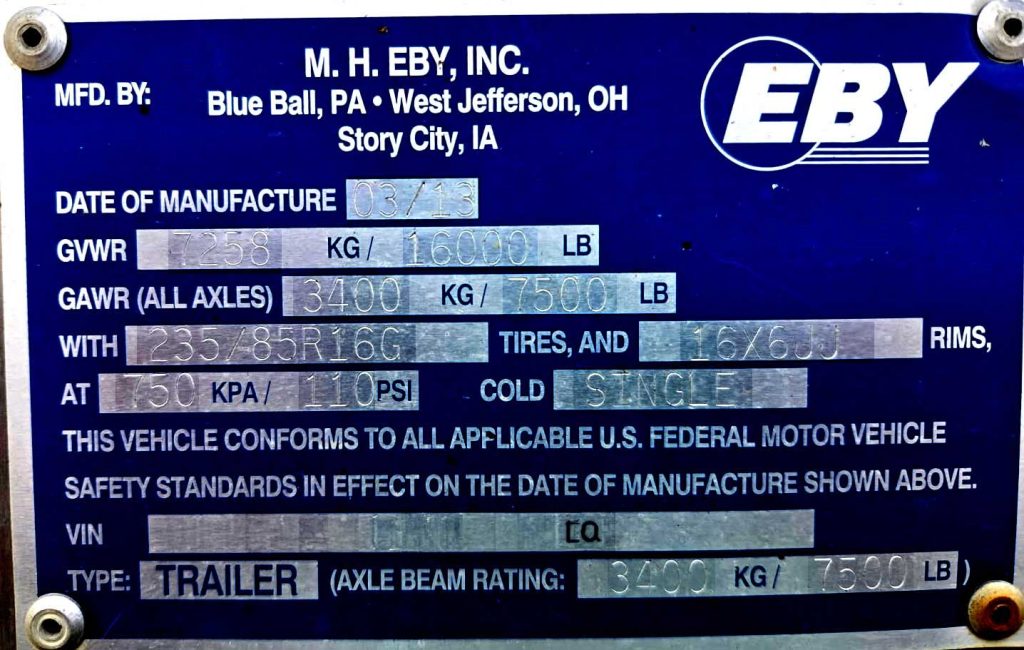
Figure 2. An example of a tag from a gooseneck cattle trailer showing load ratings.
Hitches and Components
Trailer hitches and their components (balls and ball mounts) are manufactured to meet different load ratings (Figure 3), regardless of if they are rear mounted receiver type hitches or gooseneck and 5th wheel hitches. It is possible to purchase and correctly install a receiver hitch with a lower weight rating than that of the truck. All parts should have a load rating equal to or greater than the maximum load they will be used to tow. Initial appearance may not be enough to know load capacity rating, for example, Class III, IV and some Class V hitches use 2” x 2” receiver tubes. Hitches should have a tag on them stating their tongue and towing weight capacity to verify their capacity. It may be necessary to crawl under the truck to find the tag (Table 1). Gooseneck towing capacities can range from 10,000 to 35,000 pounds depending on hitch and vehicle configuration.
Hitch balls of the same diameter do not all have the same load capacity. Shank diameter and the material they are made from can differ. The load rating should be stamped on them (Figure 3). If it is not, find one that is marked to make sure the ball is of sufficient strength for the job. Always make sure that the shank of the ball correctly fits the hole in the ball mount. A loose-fitting shank will result in movement that will weaken and break the ball assembly.

Figure 3. Examples of 2-5/16″ trailer balls with different tow load ratings
| Gross Trailer Weight | Tongue Weight | Receiver Size | |
|---|---|---|---|
| Class I | < 2,000 lbs. | < 200 lbs. | 1-¼” |
| Class II | < 3,500 lbs. | < 350 lbs. | 1-¼” |
| Class III | < 8,000 lbs. | < 800 lbs. | 2” |
| Class IV | < 10,000 lbs. | < 1,000 lbs. | 2” |
| Class V | < 20,000 lbs. | < 2,000 lbs. | 2”, 2-½”, or 3” |
Maintenance and Safety
Trucks are used for several purposes besides hauling livestock on most farms. Miles and wear often add up faster than realized, and it can be easy to fall behind on routine maintenance with all the work at the farm. Routine attention to tires, fluid levels, air filters, belts, hoses, radiators, oil and transmission coolers, along with following regular service schedules helps reduce the risk of a bad day due to breakdowns and extends the useful life of the truck. Trucks used for farm purposes often work in dirtier conditions than usual so making sure air filters, radiators and transmission coolers do not get excessively dirty helps reduce risk of overheating. The owner’s manual provides maintenance and service intervals, but they may need to be more frequent under heavier use.
Tires, Wheel Bearings, and Brakes
LT (Light Truck for use on trucks) and ST (Special Trailer, for trailer use) tires are designed specifically for heavier loads, and are made for different load ratings. Alphanumeric codes stamped on the sidewall of the tire indicate specific load and speed ratings. Always verify the ratings with the dealer or manufacturer and ensure they are adequate for your hauling needs. It is important to recognize that LT and ST tires are designed for very different purposes.
LT tires are designed for use on steering and drive axles, and have somewhat more flexible sidewalls to meet these applications and help with ride characteristics. ST tires are designed with stiffer sidewalls and constructed to handle heavy loads. This construction helps reduce the risk of trailer sway but they are not designed for use on steering or drive axles. Both types are manufactured to different load ratings, and it is important to match the load rating of the truck and trailer. Speed rating is another critical consideration for tires. Some tires may not be designed for current highway or interstate speeds.
While Wisconsin does not have regulations related to tire age, trailer tires can deteriorate with age, even if they are rarely used. The rubber may become brittle and crack before the tread wears out, creating a safety risk. Sunlight exposure can speed up this process. Inspect all tires (including spares) for dry rot, cracks in sidewalls, and cuts. Tires have a four-digit manufacture date code stamped on the sidewall. The first two digits indicate the week of the year and the second two digits indicate the year of manufacture. For example, a tire with a date code of 1425, was manufactured the 14th week of 2025.
It is required to have a minimum of 2/32” tread depth. measure tread depth at multiple locations on the tire. As shown in the pictures below, a penny can be used as a “go/ no-go gauge” to measure tread depth (Figure 4 & 5) Tire tread depth gauges are another tool for measuring tread depth and wear (Figure 6) . Proper inflation is also vital; use a tire gauge to accurately measure inflation. Replace worn and damaged tires. If there is doubt, have it inspected by a trusted auto service technician. When changing tires final tightening of lugnuts should always be done by hand, with a torque wrench, to prevent overtightening and damage.

- ✔ Put penny in grooves with Abraham Lincoln portrait in head-first.
- ✔ If you can see the top of his Abe’s head and hair, less than 2/32″ – REPLACE TIRE.
- ✔ Check multiple places across the tread.
Figure 4. Depth markings shown on a penny to determine if a tire meets minimal tread depth requirements

Figure 5. Demonstration of the correct way to use a penny to determine if a tire meets minimum tread depth.
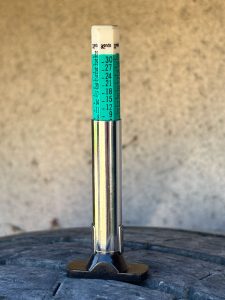
Figure 6. Tire tread depth gauge shown in use to determine actual tire tread depth.
Routinely inspect the truck and trailer’s wheel bearings and the condition of truck and trailer brakes. Checking the emergency break away battery, located on the trailer, and emergency breakaway trailer braking system should be included in routine inspections. That battery is critical for activating the brakes in the event of the trailer breaking away from the truck. At a minimum, follow the manufacturer’s service and maintenance schedule, found in the owner’s manual. Heavy use and rough conditions can accelerate wear and may require more frequent maintenance.
Some trailers are used infrequently and sit for extended periods of time. This can reduce the useful life of wheel bearings and brakes as moisture can get into places and cause corrosion. Rodents and other pests may also damage wires and other parts by making the sitting trailer their home.
Inspect the Trailer
Inside
The floor must be free of deteriorated, damaged weak spots where livestock may break through. The expected useful life of a wooden floor is approximately 10 years – and can be less if not cleaned regularly. Non-slip flooring is crucial and can be improved by attaching a cattle panel flat on the floor or installing rubber mats. Newer trailers with tread plate or diamond plate floors may have superior traction. In some cases, the tread is aggressive enough that animals can potentially damage their hooves when bracing against each other during transportation. Adding bedding can create some cushion and help with traction.
Regularly clean and wash manure off the floor as it decreases traction, increases biosecurity risk, and increases weight. The acid content of manure and urine also accelerates deterioration of the trailer floor and lower walls.
Keep In Mind: 2-3” of manure across the entire floor equals the weight of 1-2 calves. Fresh manure weighs 62.4 lb. per cubic ft., 2 inches of manure in a 20 ft x 7 ft. trailer area is 23.3 cubic feet or 1,456 lbs. against the total weight you can haul. Hauling extra weight increases fuel consumption and may push your truck and trailer over their maximum weight limit.
Inspect cut gates, latches, and hinges. Repair or replace damaged or worn parts as weak points can injure livestock and people using the trailer. All gates must fully open, close, and swing freely. Many gates have both a slam latch (Figure 7) and a pin latch; both should be functioning correctly for optimum safety. At least one self-locking (slam) latch per gate is preferred as it increases safety for the human handler. Make sure cut gates open all the way to the side wall and can be secured to the wall when open (Figure 8), as free swinging gates can lead to injury. Closing gates by “throwing” or swinging them uncontrollably is dangerous, as they can bounce back rapidly and injure handlers.
Side walls must also be free of weak areas due to rust and corrosion, rough edges, or holes. Fix every defect that animals could get a foot, nose, or other body part through.
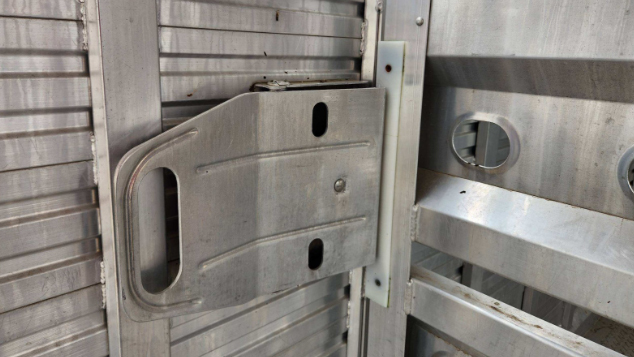
Figure 7. Slam latch on a cut gate in the closed position.
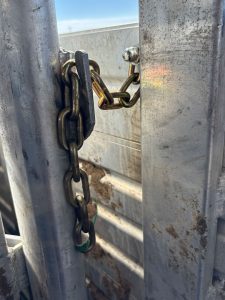
Figure 8. Cut gate in the open position and secured by a chain.
Outside
Rear gates (Figure 9) should be secured by at least two methods. For example, the main latch handle is the primary method, with a safety pin or chain as a secondary method. On rear gates that include a slider gate, the slider should also have two methods of securement.
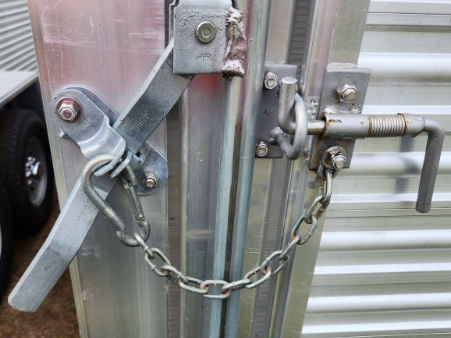
Figure 9. Rear gate with main latch handle and slider gate with a latch both secured by secondary chain and clip.
In addition to checking turn signal and brake lights for functionality, evaluate the condition of the electrical wiring harness. The protective covering should be intact and not leave bare wires exposed to the elements to prevent electrical shorts.
Safety chains that connect the trailer to the truck should also be in good condition. Remember to cross chains on bumper pull trailers. Twisting reduces the strength of the chain and should be avoided for long term use; chains should be the appropriate length and weight rating for your truck and trailer. For both gooseneck and bumper pull trailers, the breakaway brake cable must be shorter than the safety chains and connected directly to the truck. This ensures it engages before reaching the end of the chains if the trailer becomes separated from the truck.
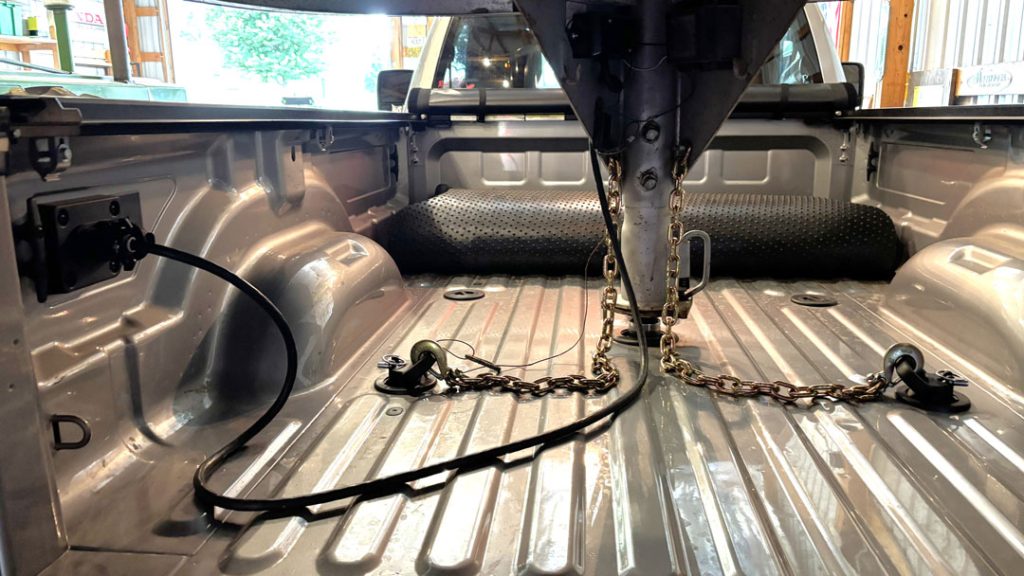
Figure 10. Safety chains secured, breakaway brake cable secured (shorter than chains), and light cable plugged in to truck.
Breakaway brake systems include a battery in a box on the trailer that activates the trailer brakes in an emergency. This battery typically charges while you’re driving with the 7-way plug connected to the truck. Be sure to check the battery charge and condition before every trip. Replace the battery when it fails to hold a charge, is visibly corroded, or it has exceeded its manufacturer-recommended life expectancy.
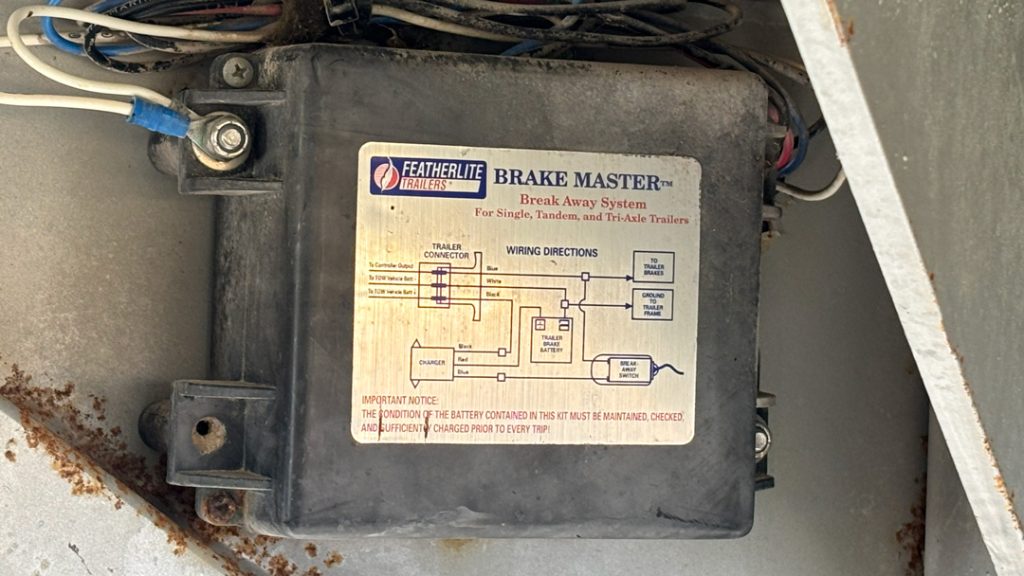
Figure 11. Control box for a break away brake system.
Be Prepared for Roadside Emergencies
Spare tires for both the truck and trailer, and a heavy-duty jack capable of lifting a loaded trailer, or a tire ramp (Figure 12) must all be accessible when the trailer is loaded. For multi-axle trailers, a ramp is an option in lieu of a jack. The ramp can be faster and safer than a jack, as it allows the tire on one axle to be changed while the other axle is supporting the load via the ramp.
Carry a small air compressor, tire pressure gauge suited to the max pressure of tires in use, flashlight, jumper cables, tow rope, lug wrench, wheel blocks/chocks (Figure 13), and a first aid kit. Auto supply stores sell pre-assembled roadside safety kits. A high-visibility vest with reflective material can increase personal safety while dealing with a roadside breakdown, especially at night. Additional items that can speed up changing tires and improve safety include cordless impact wrench (for lug nut removal only), breaker bar, torque wrench, and highway safety triangles (Figure 14). Final tightening of lug nuts should always be done by hand, with a torque wrench, to prevent overtightening and damage. An itemized list is in Table 3.
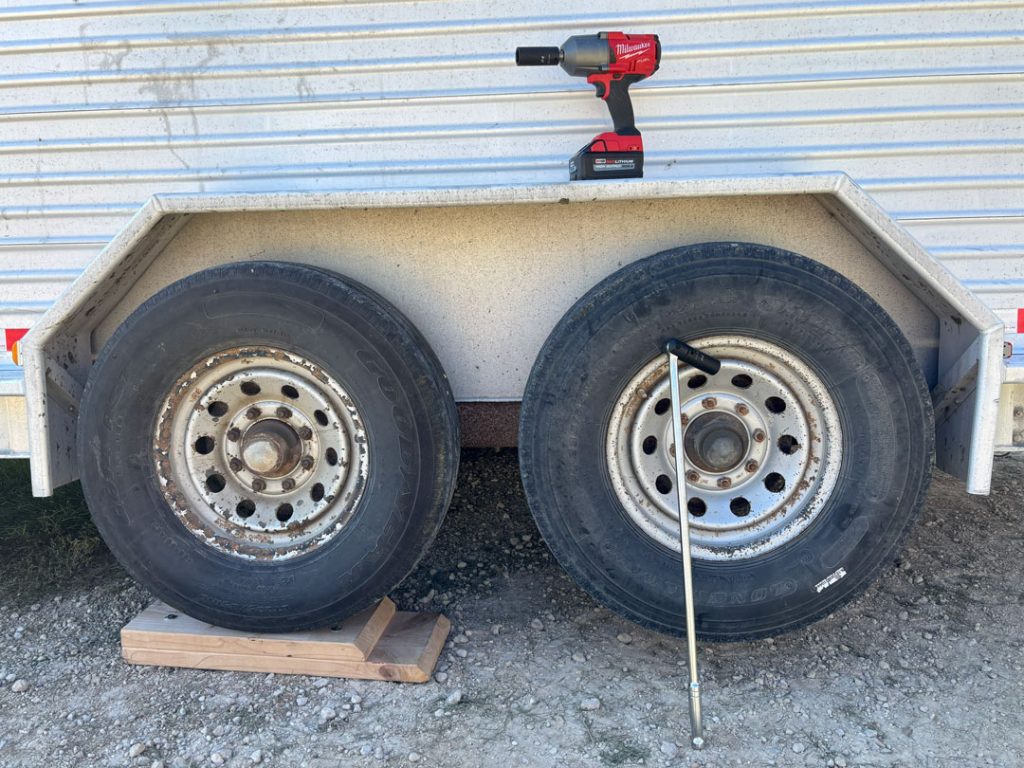
Figure 12. Demonstration of the ramp in use on two-axle trailer to elevate one tire off the ground. Impact wrench and breaker bar also shown.
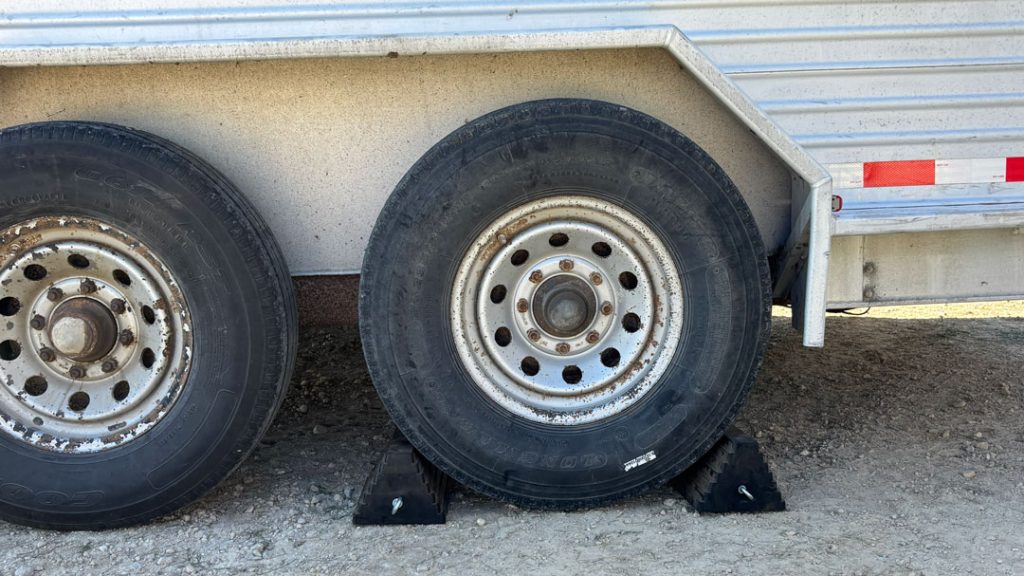
Figure 13. Tire chocks in place on the opposite side of the trailer to prevent rolling when changing a tire.

Figure 14. Example of highway safety triangle.
In summary, make sure that the tow vehicle is capable of towing and—more importantly—controlling and stopping the load safely. Take time to complete routine maintenance of the truck and trailer, and be prepared for roadside emergencies (that we hope never happen). These practices will reduce risks of injuries (or worse) for the haulers, other motorists, and livestock.
Table 2. Check list for truck and trailer safety
| Item | Checked Date | OK or NEEDS REPAIR |
|---|---|---|
| Truck tire tread and sidewalls | ||
| Truck tire pressure | ||
| Truck wheel bearings | ||
| Truck brakes | ||
| Truck oil levels | ||
| Truck coolant levels | ||
| Truck engine belts | ||
| Truck headlights, brake light, turn signals | ||
| Trailer tires tread and sidewalls | ||
| Trailer tire pressure | ||
| Trailer wheel bearings | ||
| Trailer brakes, | ||
| Trailer break away system battery | ||
| Trailer break away cable | ||
| Trailer brake lights, turn signals | ||
| Wiring harness and connection | ||
| Hitch safety chains connected correctly | ||
Table 3. Items to pack in case of a breakdown
- Spare tire
- Ramp and or jack
- First aid kit
- Flashlight
- Cordless impact (don’t over torque)
- Tire pressure gauge
- Jumper cables or jump pack
- Highway warning safety triangles
- Breaker bar
- Air compressor, cordless or works off truck
- IR temp gun to check wheel bearings on a long haul
- Basic list of number and type of animals in the load to serve as bill of lading
Published
November 11, 2026
Authors
- Bill Halfman – Division of Extension, University of Wisconsin–Madison
- Kim Cramer – Division of Extension, University of Wisconsin–Madison
Reviewers
- Brian Luck – University of Wisconsin–Madison
- Jerry Yates – West Virginia University
- Adam Hartfiel – Division of Extension, University of Wisconsin–Madison